How to Make Chocolate at Home: 7 Steps

The transformation of cacao beans into smooth, delicious chocolate is an extraordinary journey that combines science, art, and a touch of magic. While most chocolate lovers enjoy the final product, few understand the fascinating process behind creating this beloved treat. At Coracao Confections, our passion for exceptional chocolate begins with understanding and honoring every step of this remarkable transformation.
In this comprehensive guide, we'll take you through the entire chocolate-making process, from tropical cacao farms to finished chocolate bars. Whether you're curious about how premium chocolate is created professionally or interested in trying your hand at small-batch chocolate making at home, this guide will provide the knowledge and inspiration you need to appreciate the complex craft of chocolate creation.
The Origins: From Cacao Pod to Raw Beans
The chocolate journey begins in the tropical regions approximately 20 degrees north and south of the equator, where the Theobroma cacao tree thrives in the humid, shaded conditions of rainforest ecosystems.
Understanding Cacao Varieties
Before diving into the process, it's important to understand the three main varieties of cacao, as they significantly influence the final chocolate flavor:
Criollo: The rarest and most prized variety, representing about 5% of world production. Criollo beans offer complex flavor profiles with fruity, nutty, and spicy notes, but the trees are more susceptible to disease and produce lower yields.
Forastero: The workhorse of the chocolate world, comprising roughly 80% of global production. These beans provide strong, straightforward chocolate flavors and come from hardier, more productive trees.
Trinitario: A hybrid of Criollo and Forastero that combines better disease resistance with more complex flavors, accounting for about 15% of world production.
At Coracao Confections, we use heirloom cacao varieties for many of our products, including our Vegan Dark Chocolate 81%, which offers exceptional flavor complexity.
Harvesting: The Critical First Step
The chocolate-making process begins with careful harvesting:
- Pod Selection: Experienced farmers identify ripe pods by their color change (typically from green or red to yellow or orange, depending on the variety).
- Hand Harvesting: Cacao pods are carefully cut from the trunk and main branches using machetes or specialized tools, taking care not to damage the cushion-like area where future flowers will emerge.
- Pod Opening: The football-shaped pods are split open to reveal 20-50 beans surrounded by white pulp.
- Bean Extraction: The beans and surrounding pulp are scooped out, leaving the pod husks which are typically returned to the soil as organic matter.
This labor-intensive harvesting process is entirely manual, as no machine has yet been developed that can harvest cacao pods without damaging the trees.

The Transformation: Fermentation, Drying, and Processing
Once harvested, cacao beans undergo several critical processes that develop their chocolate flavor potential.
Fermentation: Developing Flavor Precursors
Fermentation is perhaps the most crucial step in developing chocolate flavor:
- Pulp Fermentation: The beans and surrounding pulp are placed in fermentation boxes or covered with banana leaves in piles.
- Microbial Action: Yeasts convert sugars in the pulp to alcohol, followed by bacteria converting the alcohol to acetic acid.
- Heat Generation: The fermentation generates temperatures up to 120°F (50°C).
- Biochemical Changes: Complex chemical changes occur within the beans, breaking down bitter compounds and developing flavor precursors—the compounds that will eventually create chocolate flavor after roasting.
- Duration: The process typically takes 5-7 days, with the beans being turned periodically to ensure even fermentation.
Properly fermented beans change color from purple to brown and develop hundreds of flavor compounds. Skipping or shortcutting this step results in bitter, one-dimensional chocolate lacking complexity.
Drying: Stabilizing and Preserving
After fermentation, beans must be properly dried:
- Sun Drying: Beans are spread out to dry in the sun, ideally on raised platforms.
- Moisture Reduction: The moisture content must be reduced from about 60% to around 7-8%.
- Timing: Drying typically takes 5-14 days, depending on weather conditions.
- Quality Checks: Beans are sorted to remove defective beans, debris, and foreign matter.
Proper drying prevents mold growth while allowing flavor development to continue. The dried beans are then ready for transport to chocolate makers around the world.
From Bean to Chocolate: The Manufacturing Process
Once quality dried beans are secured, the true craft of chocolate making begins. This process can be carried out on an industrial scale or as a small artisanal operation, but the fundamental steps remain the same.
Sorting and Cleaning
Before processing begins, beans must be thoroughly sorted and cleaned:
- Visual Inspection: Removing damaged, moldy, or flat beans.
- Debris Removal: Eliminating rocks, twigs, or other foreign objects.
- Size Grading: Sorting beans by size for more even roasting.
This stage is crucial for quality control and ensures only the best beans continue in the process. At Coracao Confections, we meticulously select our beans to ensure exceptional quality in products like our Organic Cacao Powder.
Roasting: Developing Chocolate Flavor
Roasting is where the magic begins to happen:
- Temperature Control: Beans are roasted at temperatures between 210-290°F (100-145°C).
- Time Variation: Roasting can last from 10-35 minutes, depending on the desired flavor profile.
- Maillard Reaction: This chemical reaction between amino acids and reducing sugars creates hundreds of new flavor compounds.
- Moisture Removal: Roasting reduces moisture to about 2%.
- Shell Loosening: The process loosens the shell from the nib for easier removal.
Different roasting profiles dramatically affect the final flavor of chocolate. Light roasts preserve more origin characteristics and fruity notes, while darker roasts develop deeper, more traditional chocolate flavors.
Cracking and Winnowing: Separating Shell from Nib
After roasting, beans are cracked and winnowed:
- Cracking: Beans are broken into smaller pieces.
- Winnowing: A process that separates the lightweight shells (husks) from the valuable cacao nibs using air current.
- Nib Collection: The result is pure cacao nibs—the pieces of the cacao bean that will become chocolate.
The nibs contain both cocoa solids and cocoa butter in their natural proportions—approximately 50-55% cocoa butter. These nutrient-rich nibs can be used directly in cooking or proceed to the next stages of chocolate making. Our Pure Organic Cacao Paste represents this pure form of ground cacao nibs.

Grinding: Creating Chocolate Liquor
The clean nibs are now ground into a paste:
- Initial Grinding: Nibs are ground using stone grinders, steel discs, or ball mills.
- Heat Generation: The friction from grinding generates heat that melts the cocoa butter.
- Chocolate Liquor: The result is a smooth liquid called chocolate liquor (or cocoa mass)—despite the name, it contains no alcohol.
This 100% pure ground cacao can be used as is for extremely dark chocolate, pressed to separate the cocoa butter from cocoa solids, or continue in the chocolate-making process with additional ingredients.
Formulation: Creating Different Chocolate Types
At this stage, additional ingredients are added to create different types of chocolate:
Dark Chocolate:
- Chocolate liquor
- Sugar
- Additional cocoa butter (optional)
- Vanilla or other flavorings (optional)
- Lecithin or other emulsifiers (optional)
Milk Chocolate:
- Chocolate liquor
- Sugar
- Milk powder or condensed milk
- Additional cocoa butter
- Vanilla
- Lecithin
White Chocolate:
- Cocoa butter
- Sugar
- Milk powder
- Vanilla
- Lecithin
For plant-based chocolate like our Sugar Free Coconut Milk Chocolate, we replace conventional milk powder with coconut milk powder and use alternative sweeteners.
Conching: Refining Flavor and Texture
Conching is the extended mixing, agitating, and aerating process that develops chocolate's smooth texture and complex flavor:
Coracao Pure Organic Cacao Paste
Pure cacao mass, single-origin Ecuadorian. The unsweetened building block for real chocolate from scratch, baking, or rich hot chocolate. No sugar, no fillers, just cacao.
Shop cacao paste →- Mechanical Action: The chocolate mixture is continuously mixed and aerated.
- Heat Application: Temperatures typically range from 110-180°F (45-80°C).
- Time Factor: Conching can last from a few hours for basic chocolate to several days for premium varieties.
- Flavor Development: Unwanted volatile compounds evaporate while desirable flavor compounds develop and meld.
- Particle Refinement: The particles of cocoa, sugar, and other ingredients are reduced to around 15-20 microns for smooth mouthfeel.
Conching is where the art of chocolate making truly shines. Master chocolatiers adjust time, temperature, and motion to create their signature chocolate profiles. The longer the conching, generally the smoother and more refined the chocolate.
Tempering: Creating Structure and Shine
The final crucial step before molding is tempering—a precise heating and cooling process that ensures proper crystallization of cocoa butter:
- Melting: Chocolate is completely melted to around 115°F (46°C) to eliminate all crystal structures.
- Cooling: It's then cooled to about 80°F (27°C) to promote the formation of stable and unstable crystal types.
- Reheating: The chocolate is carefully reheated to 88-91°F (31-33°C), which melts unstable crystals while preserving the stable Form V crystals.
- Working: The chocolate is agitated throughout this process to distribute the crystal formation evenly.
Properly tempered chocolate has:
- A glossy shine
- A clean snap when broken
- A smooth mouthfeel
- Resistance to bloom (whitish streaks or spots)
This process requires precision, as temperatures must be maintained within 1-2 degrees for success.
Molding and Packaging: The Final Steps
Once tempered, chocolate is ready for its final form:
- Molding: The tempered chocolate is poured into molds of various shapes.
- Cooling: Controlled cooling solidifies the chocolate while maintaining proper crystal structure.
- Demolding: The solid chocolate is removed from the molds.
- Packaging: The finished chocolate is wrapped and packaged for distribution.
For filled chocolates and truffles like our Berkeley Chocolate Truffle Box, additional steps include creating centers and coating or enrobing them in tempered chocolate.
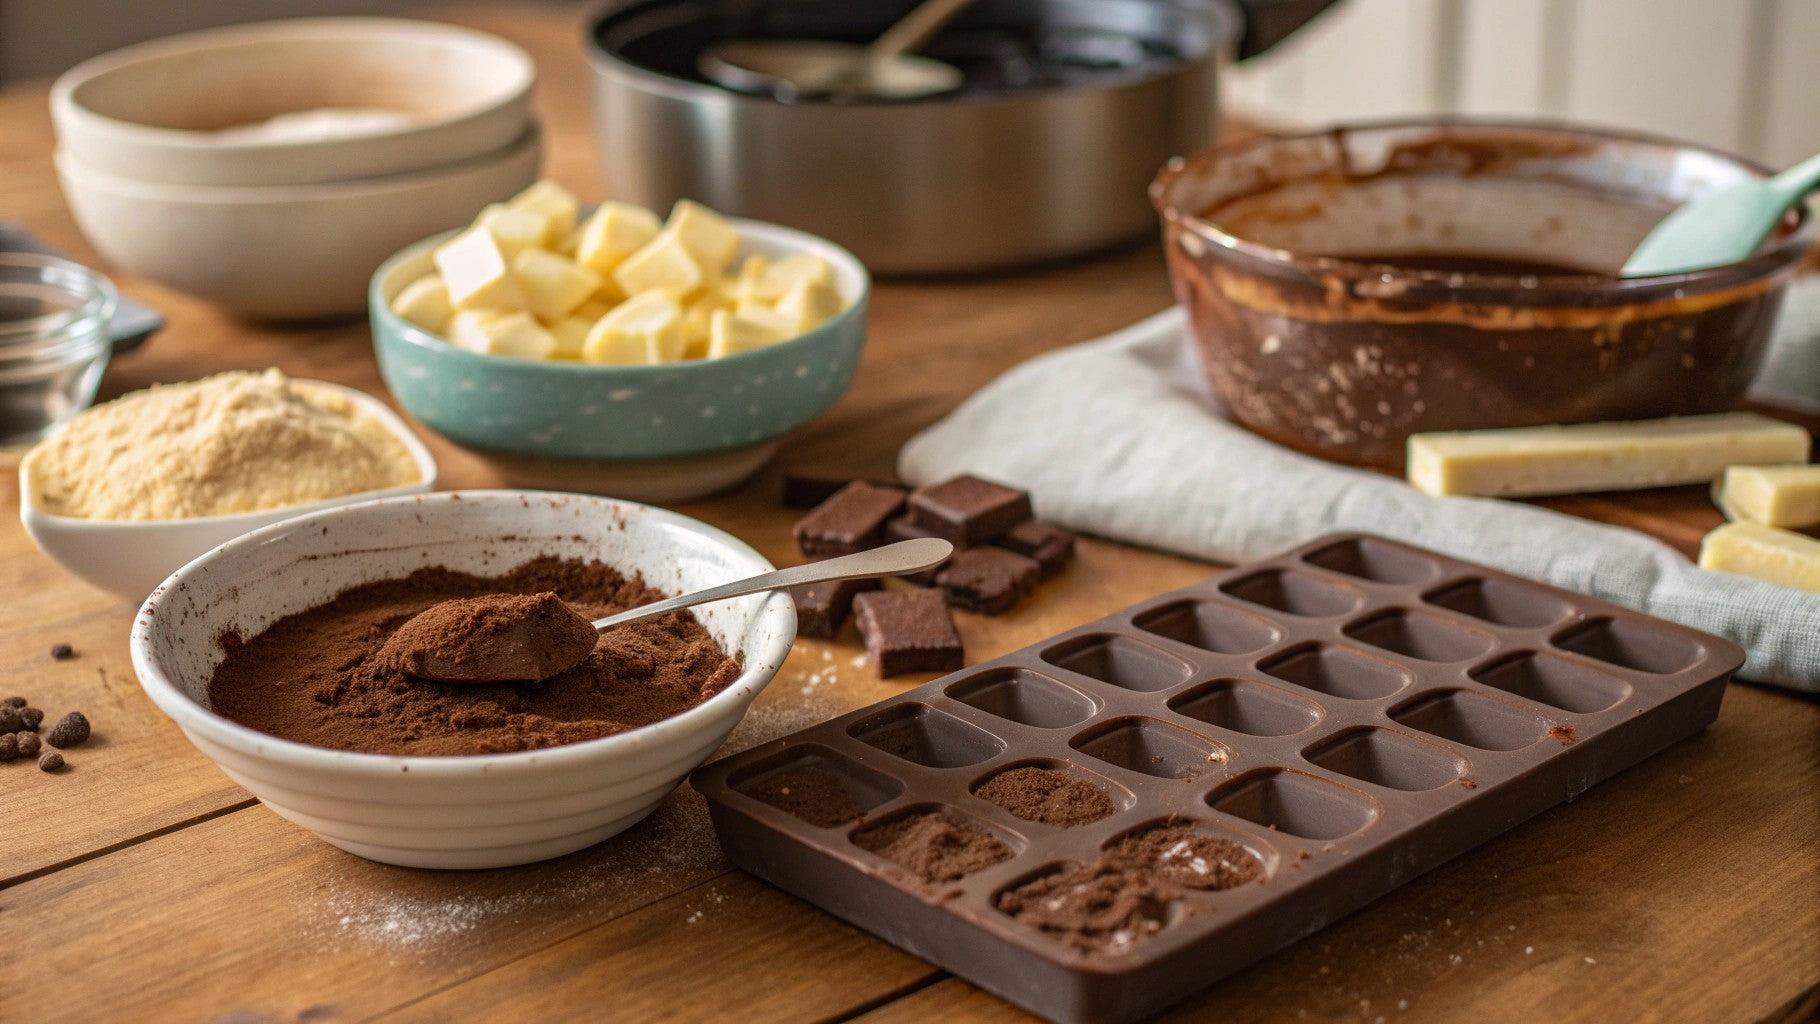
Creating Chocolate at Home: Small-Scale Methods
While commercial chocolate making requires specialized equipment, creating chocolate at home is possible with some adaptations and simplified methods.
Method 1: Starting From Cacao Nibs
This approach bypasses the bean roasting, cracking, and winnowing steps:
Ingredients:
- 1 cup (150g) cacao nibs
- 1/4 cup (50g) cacao butter
- 1/4 cup (50g) sweetener (powdered sugar, coconut sugar, or other preferred sweetener)
- 1 tsp vanilla extract (optional)
- Pinch of salt
Equipment:
- Food processor or high-powered blender
- Double boiler
- Chocolate molds or parchment-lined tray
- Instant-read thermometer
- Spatula
Process:
- Grind the Nibs: Process cacao nibs in a food processor for 15-20 minutes, scraping down sides periodically, until they release their oils and form a paste (similar to nut butter consistency).
- Add Cocoa Butter: Melt cocoa butter in a double boiler, then add to the food processor with the ground nibs. Continue processing until smooth.
- Add Remaining Ingredients: Add powdered sweetener, vanilla, and salt. Process until thoroughly combined and smooth.
-
Temper the Chocolate:
- Heat the mixture to 115°F (46°C)
- Cool to 80°F (27°C)
- Reheat to 88-91°F (31-33°C)
- Maintain this temperature while working
- Mold and Cool: Pour into molds or onto a parchment-lined tray and allow to cool at room temperature.
This home method produces a simplified chocolate with a slightly different texture than commercial chocolate but captures the essential chocolate-making process.
Method 2: Using Cocoa Powder and Cocoa Butter
For those wanting an even simpler approach:
Ingredients:
- 1 cup (100g) Organic Cacao Powder
- 1/2 cup (100g) Organic Cacao Butter
- 1/3 cup (65g) powdered sugar or alternative sweetener
- 1 tsp vanilla extract
- Pinch of salt
Process:
- Melt Cocoa Butter: Gently melt cocoa butter in a double boiler.
- Mix Ingredients: Sift cocoa powder and sweetener together, then whisk into melted cocoa butter. Add vanilla and salt.
- Temper: Follow the tempering process described above.
- Mold and Set: Pour into molds or a lined tray and allow to set.
While this method bypasses several traditional chocolate-making steps, it still produces a satisfying chocolate with good snap and shine when properly tempered.

Advanced Techniques for Serious Home Chocolatiers
For those ready to take their chocolate making to the next level:
Bean-to-Bar at Home
The complete bean-to-bar process can be adapted for home use:
- Sourcing Quality Beans: Look for single-origin cacao beans from reputable suppliers.
- Home Roasting: Use a coffee roaster, modified popcorn popper, or oven (250-275°F for 15-25 minutes, until beans smell chocolatey and shells crack easily).
- Cracking and Winnowing: Crack roasted beans in a food processor with pulse function, then winnow by pouring between bowls in front of a fan or using a hair dryer on cool setting.
- Grinding and Conching: Use a powerful food processor, melanger, or stone grinder (such as a Premier Wonder Grinder or Spectra 11) running for 12-48 hours.
- Aging: Allow the chocolate to rest for several weeks to develop flavor (optional).
- Tempering and Molding: Follow standard tempering procedures.
This approach requires more equipment investment but allows complete control over every aspect of the chocolate-making process.
Creating Custom Flavor Profiles
Once comfortable with basic chocolate making, experiment with:
- Roasting Variations: Try different roasting times and temperatures to highlight various flavor notes.
- Origin Exploration: Experiment with beans from different regions to discover their unique flavor profiles.
- Inclusions and Infusions: Add spices, herbs, fruits, or nuts to create signature chocolate blends.
- Sweetener Alternatives: Explore coconut sugar, maple sugar, or other alternatives to create distinctive flavor profiles.
Our Cherry Amaretto Dark Chocolate and Sourdough & Olive Oil Chocolate Bar demonstrate how creative flavor combinations can elevate chocolate to new heights.
The Coracao Approach to Chocolate Making
At Coracao Confections, our chocolate-making philosophy combines traditional methods with innovative techniques:
Our Chocolate Standards
- Organic Certification: We use only certified organic ingredients, ensuring our chocolate is free from synthetic pesticides and fertilizers.
- Direct Trade Relationships: We source cacao from regenerative farms that support ecological diversity and pay farmers fair wages.
- Minimal Processing: Our methods preserve cacao's natural beneficial compounds rather than stripping them away.
- Plant-Based Innovation: We create exceptional vegan chocolate using coconut sugar and plant-based milk alternatives.
- Climate Consciousness: As an employee-owned, Certified Climate Neutral company, sustainability informs every aspect of our production.
For those interested in learning more about different chocolate varieties, our blog post on Types of Chocolate Bars offers deeper insights into chocolate classifications and qualities.
Frequently Asked Questions About Creating Chocolate
How long does the entire chocolate-making process take?
From harvesting cacao pods to finished chocolate bars, the process typically takes several weeks to months. Fermentation takes 5-7 days, drying takes 5-14 days, and aging chocolate after production can take several additional weeks for flavor development. Commercial operations with continuous production can streamline some steps, but quality chocolate is never rushed.
What equipment is essential for making chocolate at home?
At minimum, you'll need a food processor or high-powered blender, double boiler, thermometer, and molds. For bean-to-bar chocolate, additional equipment includes a roaster, cracking and winnowing tools, and ideally a melanger or stone grinder for proper texture development.
Can I make chocolate without tempering?
Yes, but untempered chocolate will lack proper shine and snap, may have a softer texture, and is prone to bloom (whitish streaks or spots). For simple home recipes or chocolate destined for baking, tempering can be optional, but for eating chocolate, it significantly improves quality.
Why is my homemade chocolate grainy?
Graininess usually results from insufficient grinding/conching or improper tempering. Commercial chocolate undergoes extended conching to reduce particle size below 20 microns (smaller than the tongue can detect). Home equipment often cannot achieve this level of refinement. Using pre-ground cocoa powder rather than nibs can help reduce graininess.
Is it cheaper to make chocolate at home?
Generally, no. Quality ingredients (especially cocoa butter) are expensive, and the equipment for proper chocolate making represents a significant investment. Home chocolate making is typically pursued for the craft and customization options rather than cost savings.
The Endless Journey of Chocolate Creation
Creating chocolate is both a science and an art—a process that combines precise techniques with intuitive craft. Whether you're appreciating the complex journey your favorite chocolate bar has taken or embarking on your own chocolate-making adventure, understanding this process deepens your connection to one of the world's most beloved foods.
At Coracao Confections, we believe that exceptional chocolate comes from honoring every step of this remarkable transformation—from the careful tending of cacao trees to the final tempering that creates that perfect snap. Our commitment to organic ingredients, ethical sourcing, and thoughtful production reflects our respect for both the tradition and innovation in chocolate making.
The next time you enjoy a piece of premium chocolate, take a moment to appreciate the extraordinary journey those cacao beans have taken—from tropical farm to fermentation box, from roaster to conche, and finally to the carefully tempered bar in your hand. It's a process that spans continents, requires multiple skilled craftspeople, and represents one of humanity's most delicious inventions.
Ready to experience the difference that meticulous chocolate creation makes? Explore our collection of premium organic chocolate products crafted with integrity and exceptional flavor.
Shop our collection of artisanal chocolate creations, made with the finest organic ingredients and time-honored techniques.
More Coracao chocolate
Maker-direct bars and pantry staples. Single-origin cacao, no refined sugar shortcuts.

- 99% cacao, zero added sugar
- USDA Organic, Fair Trade
- ~30 mg natural caffeine / oz

- 81% dark, single-origin cacao
- Toasted almonds, flaky sea salt
- Salty-sweet crunch in every bite

- Plant-based milk chocolate
- Crisped quinoa, no wheat
- Sugar-free

Claire Bennett
I'm Claire, a chocolate lover and artisan based in a small town where I run a tiny home kitchen dedicated to exploring everything chocolate. From single-origin dark bars to creamy ganache and handmade truffles, I find joy in working with all types of chocolate. I believe chocolate has a story, and I love bringing that story to life through humble, heartfelt creations.

Leave a comment
This site is protected by hCaptcha and the hCaptcha Privacy Policy and Terms of Service apply.